Gardening 101
So, I know that many of you are expert gardeners, but I would like to bet that some of you have wanted to put in a vegetable garden for a long time but have felt so intimidated by the idea that you have put it off year after year after year after... (You get the picture). If this sounds like you, please continue reading!
Below you will find my recommendation for beginning gardeners, and some reminders for anyone needing a refresher!
Below you will find my recommendation for beginning gardeners, and some reminders for anyone needing a refresher!
Before we talk about gardening, let's talk about soil! You hear a lot about soil and, well soil is great! It’s the foundation of life! It is living and you need to take care of it. The easiest way to learn the basics about your soil is to put a golf ball size of it in your hand, wet it like a damp sponge, and knead it a minute or so. Then, use your thumb to push a bit of soil at a time over the edge of your hand. If it sticks together and you feel like you could start to make pottery, it is pretty clayey soil. If it just falls apart, it is sandy. If it is somewhere in-between, you are lucky! Clay soil holds a lot of water, is hard to work with, and is heavy. It also tends to hold on to nutrients (which is good). Sandy soil (just think beach) is easy to work with but water goes through it very fast and nutrients readily leach out.
That said, no matter which soil you have, it is a good idea to add finished compost and / or organic matter throughout the growing season including at the end of it. Just a thin layer here and there… you don’t want to see bare soil. By doing this you will be feeding the soil microbes, feeding the plants, suppressing weeds or making them easier to pull, and preventing water loss. As an added bonus, you will never need to add synthetic fertilizer if you take care of your soil!
That said, no matter which soil you have, it is a good idea to add finished compost and / or organic matter throughout the growing season including at the end of it. Just a thin layer here and there… you don’t want to see bare soil. By doing this you will be feeding the soil microbes, feeding the plants, suppressing weeds or making them easier to pull, and preventing water loss. As an added bonus, you will never need to add synthetic fertilizer if you take care of your soil!
When it comes to your very first garden, start small and start early!
By small, I mean no bigger than 4' X 8'. However, 4' X 4' would be even better if you have never, ever, even grown as much as a house-plant. And by early, I mean start planning/preparing in the fall.
Size and Location (Fall):
Where do I start you may ask? That is actually a great question! You would start with finding an area that receives at least 8 hours of sun and that also has easy access to water. That would mean you need to pay attention to your yard in the morning, afternoon, and late in the day; weekends are often best for this. And, without easy access to water, you might get pretty tired of hauling water to your garden or might not be able to keep up with its needs.

Preparation (Fall):
Honestly, I have had to accept that I’ve become a lazy gardener… and that is okay! I learned, after hundreds of hours of digging or tilling garden beds, that I was just wasting my time. Why do all that hard labor when you can more efficiently build a healthy and soil friendly garden bed using a no-dig method? Some people call it lasagna gardening. What a delicious name! When you layer on this organic matter and choose not to dig, not only do you save yourself many back-breaking hours but you preserve the integrity and structure of the soil and feed all the little soil-building critters that call your soil home.
Mark out your area, about a foot longer and wider than you originally planned. Cut the grass / weeds that are currently growing there as short as you can… go ahead and scalp it! Then, take all those Amazon, Chewy, and FedEx boxes that have been collecting in the corner, break them down flat and use them to cover that area one layer deep but overlapping by about 6 – 8 inches. Wet them with a hose. You could also use sections of wetted newspaper but they need to be thick sections. You may need to put a few bricks (or something else with heft) on them to keep them down.
Then, over the next couple months, every time you mow, lay down a thin layer (1/2 inch or so) of grass clippings on top. (If you dry the grass first, you don’t want it to become slimy, you could lay it down thickly.) After the leaves fall from the trees and dry out a little, chop them with your mower and put them on top too. Keep doing this until mowing season is over and the leaves stop shedding. If you have a compost pile or access to bulk compost or have some bagged compost, you could layer that in too.
Oh, and if you used a bale of straw as a fall decoration, spread that out on it as well. Keep the pile moist (not soggy) -- think wrung-out sponge! Some people cover their beds with a tarp or something similar however I never have and it’s worked just fine.
A couple hints for lasagna gardening... Chopping everything into small bits helps them decompose faster. You can layer most organic matter, even if it was not mentioned here. Some examples include: used coffee grounds, tea bags, weeds that have no seeds or that don’t root along the stem, coconut choir, egg shells, spent plants, etc. You can typically recognize if a plant sprouts along its stem if it is a vine and / or when you pull it, there are little roots coming out of the stem opposite to the leaves. Don’t use dairy, meat, or oils and fats unless you are trying to ring the dinner bell for the neighborhood wildlife, dogs, and cats. Also, it can get a bit stinky!
By late spring the bugs, worms, microorganisms, and weather should have done its work and your ground should be grass or weed free, fluffy, and ready to plant. Even if it doesn’t look like what you would normally plant into yet, go ahead and live on the wild side, and plant your garden (more on this later). However, if you are not the ‘wild side’ sort of person (no judgement here!) – spread out an inch or so of compost or some topsoil over the top. Then plant through this.

What to Plant (Winter):
If you remember way back to the first part of this article where I caution you to ‘keep it small.’ This still applies! It is so easy, even for us experienced gardeners, to get excited by all the choices and to buy, buy, buy so many plants and seeds that we could plant 10 gardens. And then we end up tucking them willy-nilly into any place they might (or might not) fit or giving them away. Or, even worse, the poor things sometimes get put in a corner only to be forgotten and then found mid-summer shriveled beyond redemption. Do not fall into that trap, trust me! Your life will be so much easier and you will have a much more successful start-up garden.
Now, write down a list of vegetables or fruits that you might want to grow. Things that you and your family like to eat. A suggested list of easy to grow produce as well as whether they are easier to grow by direct seeding into the garden bed or transplanting plants include but is not limited to:
Next, it is time to do some research. Look online for well-known garden supply centers. If you like paper, request a catalogue. If not, peruse their sites looking for your chosen favorites. These sites often will tell you the growing specifications for each plant and you will probably get side tracked by all of the choices out there however, gently pull yourself back to your goal. There is always next year to spread your wings. This is not to say you can’t change your mind… just be cautious. These sites will tell you a lot about your plants and could become overwhelming. Here is a list of just a few things you might want to learn about the plants you are considering:
If you remember way back to the first part of this article where I caution you to ‘keep it small.’ This still applies! It is so easy, even for us experienced gardeners, to get excited by all the choices and to buy, buy, buy so many plants and seeds that we could plant 10 gardens. And then we end up tucking them willy-nilly into any place they might (or might not) fit or giving them away. Or, even worse, the poor things sometimes get put in a corner only to be forgotten and then found mid-summer shriveled beyond redemption. Do not fall into that trap, trust me! Your life will be so much easier and you will have a much more successful start-up garden.
Now, write down a list of vegetables or fruits that you might want to grow. Things that you and your family like to eat. A suggested list of easy to grow produce as well as whether they are easier to grow by direct seeding into the garden bed or transplanting plants include but is not limited to:
- Swiss chard (direct seed or transplants)
- Tomatoes (transplants)
- Peppers (transplants)
- Egg-plants (transplants)
- Radishes (direct seed)
- Green beans (direct seed)
- Peas (direct seed)
- Beets (direct seed or transplants)
- Lettuce and spinach: both like cool weather (direct seed or transplants)
- Kohlrabi (direct seed or transplants)
- Bush zucchini and patio cucumbers: Look out for the squash bug and squash vine borer mentioned below. Even if they show up, you should be able to get a good harvest in before either of these insects become too much of a problem.
Next, it is time to do some research. Look online for well-known garden supply centers. If you like paper, request a catalogue. If not, peruse their sites looking for your chosen favorites. These sites often will tell you the growing specifications for each plant and you will probably get side tracked by all of the choices out there however, gently pull yourself back to your goal. There is always next year to spread your wings. This is not to say you can’t change your mind… just be cautious. These sites will tell you a lot about your plants and could become overwhelming. Here is a list of just a few things you might want to learn about the plants you are considering:
- How tall and wide the plant might get
- What it tastes like
- If it needs support
- How much water it needs
- What kind of soil it likes
- How much sun it likes
- How deeply to plant it
- When to plant it
- Diseases it is prone to
- For example, corn is primarily wind pollinated and needs a bit of space. From my research (I rarely grow corn – but have in the past) you could get away with planting a 4’ X 4’ block of corn.
- Other challenging plants to grow in small spaces are watermelons, pumpkins, cucumbers, winter squash, cantaloupe, and similar vining plants. Not only do they take up a lot of space but they are prone (at least in this location) to squash vine borer and squash bugs. And, to plan for success, you don’t need this frustration, save it for later when you have more experience. That said, if you still want to grow them, after all we grow what we want to eat, look for space saving varieties that you can also trellis.
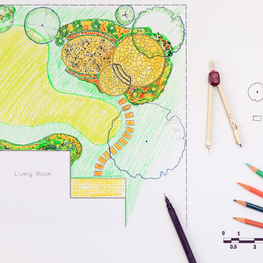
Planning/Mapping (Winter):
It's starts with drawing your proposed garden on graph paper. Whether you use a small grid or larger grid paper, it’s usually simplest to set it up with one square representing a 1' X 1' area. This means, for example, that for an 8' X 4' garden it will be 8 boxes long and 4 boxes wide. Some people like to do this on their computer. If that is you, go for it.
Label the N, S, E, and W sides. This is important because of shadows. For example, here in Ohio, the sun has a Southern inclination. Therefore, if you plant something tall on the south side of the garden it will shade out the plants on the opposite (north) side. This isn’t all bad if you have plants such as lettuce and spinach that could benefit from some shade (as long as too much of the sun isn’t blocked). Tall plants on the east side of your garden will cast some morning shade and on the west side of your garden will cast some late afternoon shade. Tall plants on the north side will not affect the shade in your garden.
List the plants you want, in the corner of your paper, with a key for each plant; this helps visually. Then, using the information you have already gleaned, put the plants where they fit. I will admit to being the sticky note queen here. I love to use sticky notes on a sheet of paper and then, once I have my plan in place, put it on graph paper for something more permanent. I can see you computer people rolling your eyes here!
A few other things to watch for are:
Ordering / Purchasing plants and seeds: Here is the thing. You have done all this research and found the most perfect plants for your garden and then decided to go to the local big box store or greenhouse down the road to purchase your plants. This could be a problem if you are not yet that knowledgeable about plants. There are a gazillion (is this a number?) plants out there and each plant type often has multiple varieties and therefore characteristics. These are called hybrid plants. Or, you could get the heirloom versions, which means that specific type has been around for many, many, years without being bred for different characteristics. They are what they were. I would suggest, on this your maiden voyage, sticking with the plants you originally planned from the original source. That is not saying you couldn’t go to the greenhouse and store and get your plants but you would be hedging your bets by ordering the ones you specifically chose. Plus, you did get their catalogue and use their site for research… somehow I feel guilty if I don’t purchase at least some of my plants from them (or maybe that is just me).
Tools and Supplies: I’ve found the following basic tools and supplies to be most helpful to have on hand before gardening season begins. You can go hog wild and get more, but this will get you by. Down the road you will know if you need (want?) more.
It's starts with drawing your proposed garden on graph paper. Whether you use a small grid or larger grid paper, it’s usually simplest to set it up with one square representing a 1' X 1' area. This means, for example, that for an 8' X 4' garden it will be 8 boxes long and 4 boxes wide. Some people like to do this on their computer. If that is you, go for it.
Label the N, S, E, and W sides. This is important because of shadows. For example, here in Ohio, the sun has a Southern inclination. Therefore, if you plant something tall on the south side of the garden it will shade out the plants on the opposite (north) side. This isn’t all bad if you have plants such as lettuce and spinach that could benefit from some shade (as long as too much of the sun isn’t blocked). Tall plants on the east side of your garden will cast some morning shade and on the west side of your garden will cast some late afternoon shade. Tall plants on the north side will not affect the shade in your garden.
List the plants you want, in the corner of your paper, with a key for each plant; this helps visually. Then, using the information you have already gleaned, put the plants where they fit. I will admit to being the sticky note queen here. I love to use sticky notes on a sheet of paper and then, once I have my plan in place, put it on graph paper for something more permanent. I can see you computer people rolling your eyes here!
A few other things to watch for are:
- Over-crowding (stick with recommended spacing for your first garden)
- Putting plants that have different watering requirements together (for example, don’t put a cactus next to water-loving greens)
- Types of support: know what type of support your plants might need and how much space it will take up
Ordering / Purchasing plants and seeds: Here is the thing. You have done all this research and found the most perfect plants for your garden and then decided to go to the local big box store or greenhouse down the road to purchase your plants. This could be a problem if you are not yet that knowledgeable about plants. There are a gazillion (is this a number?) plants out there and each plant type often has multiple varieties and therefore characteristics. These are called hybrid plants. Or, you could get the heirloom versions, which means that specific type has been around for many, many, years without being bred for different characteristics. They are what they were. I would suggest, on this your maiden voyage, sticking with the plants you originally planned from the original source. That is not saying you couldn’t go to the greenhouse and store and get your plants but you would be hedging your bets by ordering the ones you specifically chose. Plus, you did get their catalogue and use their site for research… somehow I feel guilty if I don’t purchase at least some of my plants from them (or maybe that is just me).
Tools and Supplies: I’ve found the following basic tools and supplies to be most helpful to have on hand before gardening season begins. You can go hog wild and get more, but this will get you by. Down the road you will know if you need (want?) more.
- Metal trowel (small hand held shovel)
- Pruner (get the bypass style- they work like scissors)
- Scissors
- Buckets and totes for hauling soil, compost, weeds, and your harvest
- Garden cart and / or wheel barrow (Wheel barrows are handy but not necessary for a small garden or yard)
- If you are trellising, soft string or cut up strips of a cotton shirt
- Hose with long, adjustable watering wand
- You could also add a garden rake and a shovel to keep the edges neat if you so choose
- Quality compost
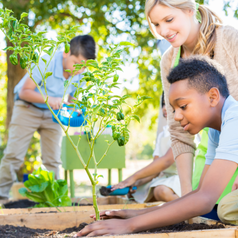
Planting (Spring):
The first step for planting is knowing when to plant. This can be tricky as it is necessary to know your first frost free date. You can search this on-line, call your local Soil and Water Conservation District (SWCD) or your local university agricultural extension agent’s office. Some plants and seeds can be planted before this date (for example spinach and sugar snap peas) and some need to wait for the soil to warm up (for example tomatoes, peppers, and squash). Make sure to look at the plant and seed specifications you researched.
If you are planting seeds, it can be helpful to take a dowel and mark a variety of depths on the dowel: 1/8”, ¼”, ½”, and 1”. This will make planting seeds at the correct depth easy. You could also mark out 6”, 8”, and 12” to help with spacing. Then you will have an all-in-one, very inexpensive, tool. Make sure to plant at the recommended depth found on the package. If you plant too shallow the seeds could pop up and become food for birds. If too deep then they might struggle to emerge.
Here is how: using your handy dandy measuring tool, poke a hole in the soil, drop a seed (or two) into the hole, cover the hole with soil, and gently press down on it to ensure contact with the soil. Most people plant seeds vs. transplants for the following types of plants: lettuce, Swiss chard, beans, peas, spinach, carrots, green onions, radishes. If you live in the Northern latitudes it is helpful to start with transplants such as tomatoes, peppers, cabbage, herbs, and collards. These are not all-inclusive lists but are really just a few examples.
If you are planting transplants, make sure that you have slowly introduced them to the sunlight and breezes. This is called hardening off. Put them in the shade in a protected area when you first get them. Slowly, day by day, introduce them to a couple more hours of light. Keep them watered – like a well rung out sponge all the way to the bottom. You will also need a trowel. Use the trowel to dig a small hole about the depth and width of the pot that the plant is in.
Maintenance (Late Spring/Summer/Early Fall):
Watering: Gardens need about 1 inch of water a week. However, know your root zones; small leafy vegetable have shallower roots compared to larger plants and your goal is to thoroughly wet down to the bottom of the roots. Also, limit most of your watering to the root zones rather than the leaves. If you do water the leaves occasionally it is best to do so in the morning to give them time to dry off.
Weeding: It’s easiest and disturbs the roots of your plants less if you pull the weeds while small. This means, patrol your garden daily if you can or several times a week if you can’t. Make sure to get all of the root but shake the soil back into the garden.
Insect patrol: If you can, patrol for insects daily. A good time is in the morning. If you can’t do it daily, try at least a couple times a week. Look for eggs, holes, insects, frass (looks like sawdust but is actually insect poop), etc. There are many available resources when considering insect control and the subject matter is too large for this article. However, for the sake of health, both animal and environmental, it is safer to research methods that are considered natural. Start with the least invasive. Also consider planting some flowers and herbs to attract beneficial insects.
Picking: When harvesting it is ideal to harvest in the cool morning hours. However, we know that this is not always possible, so if you have to harvest in the heat it is usually a good idea to quickly cool off your produce with some cool water; that said, tomatoes and peppers don’t seem to need this. Also, be gentle. The stems of certain plants will break or tear if tugged with too much force when picking your produce. You might need some scissors or pruners to help you out.
Conclusion:
To summarize, start small and have water available; don’t dig – layer; plan ahead of time and don’t get overwhelmed by the options or on the other side of the coin, carried away and do too much; do your research; take care of the soil; and learn from your experiences.
Gardening is gratifying. Not only will you reap the rewards of having fresh fruits and vegetables to eat but gardening helps you stay in shape, become more observant, learn patience, and be more in-tune with nature. That said, gardening is an ongoing process. It is a continual learning experience and one that is sure to surprise you, sometimes happily and sometimes frustratingly, but never will you be bored.
Garden on!
The first step for planting is knowing when to plant. This can be tricky as it is necessary to know your first frost free date. You can search this on-line, call your local Soil and Water Conservation District (SWCD) or your local university agricultural extension agent’s office. Some plants and seeds can be planted before this date (for example spinach and sugar snap peas) and some need to wait for the soil to warm up (for example tomatoes, peppers, and squash). Make sure to look at the plant and seed specifications you researched.
If you are planting seeds, it can be helpful to take a dowel and mark a variety of depths on the dowel: 1/8”, ¼”, ½”, and 1”. This will make planting seeds at the correct depth easy. You could also mark out 6”, 8”, and 12” to help with spacing. Then you will have an all-in-one, very inexpensive, tool. Make sure to plant at the recommended depth found on the package. If you plant too shallow the seeds could pop up and become food for birds. If too deep then they might struggle to emerge.
Here is how: using your handy dandy measuring tool, poke a hole in the soil, drop a seed (or two) into the hole, cover the hole with soil, and gently press down on it to ensure contact with the soil. Most people plant seeds vs. transplants for the following types of plants: lettuce, Swiss chard, beans, peas, spinach, carrots, green onions, radishes. If you live in the Northern latitudes it is helpful to start with transplants such as tomatoes, peppers, cabbage, herbs, and collards. These are not all-inclusive lists but are really just a few examples.
If you are planting transplants, make sure that you have slowly introduced them to the sunlight and breezes. This is called hardening off. Put them in the shade in a protected area when you first get them. Slowly, day by day, introduce them to a couple more hours of light. Keep them watered – like a well rung out sponge all the way to the bottom. You will also need a trowel. Use the trowel to dig a small hole about the depth and width of the pot that the plant is in.
- Thoroughly water the plants a couple hours before
- Carefully remove the plant from the pot it is in
- Do not tug on the plant
- Carefully tip the pot over onto your hand while allowing the plant itself to hang between your fingers
- Gently squeeze and tap the sides and bottom of the pot
- It should fall into your hand. If it doesn’t, a small butter-knife inserted between the soil and pot can help
- Put the plant into the hole at the same depth at which it was planted in the pot, push the soil back into the hole, and carefully push down on the soil to make sure the roots have good contact.
- Label your plants and / or rows
Maintenance (Late Spring/Summer/Early Fall):
Watering: Gardens need about 1 inch of water a week. However, know your root zones; small leafy vegetable have shallower roots compared to larger plants and your goal is to thoroughly wet down to the bottom of the roots. Also, limit most of your watering to the root zones rather than the leaves. If you do water the leaves occasionally it is best to do so in the morning to give them time to dry off.
Weeding: It’s easiest and disturbs the roots of your plants less if you pull the weeds while small. This means, patrol your garden daily if you can or several times a week if you can’t. Make sure to get all of the root but shake the soil back into the garden.
Insect patrol: If you can, patrol for insects daily. A good time is in the morning. If you can’t do it daily, try at least a couple times a week. Look for eggs, holes, insects, frass (looks like sawdust but is actually insect poop), etc. There are many available resources when considering insect control and the subject matter is too large for this article. However, for the sake of health, both animal and environmental, it is safer to research methods that are considered natural. Start with the least invasive. Also consider planting some flowers and herbs to attract beneficial insects.
Picking: When harvesting it is ideal to harvest in the cool morning hours. However, we know that this is not always possible, so if you have to harvest in the heat it is usually a good idea to quickly cool off your produce with some cool water; that said, tomatoes and peppers don’t seem to need this. Also, be gentle. The stems of certain plants will break or tear if tugged with too much force when picking your produce. You might need some scissors or pruners to help you out.
Conclusion:
To summarize, start small and have water available; don’t dig – layer; plan ahead of time and don’t get overwhelmed by the options or on the other side of the coin, carried away and do too much; do your research; take care of the soil; and learn from your experiences.
Gardening is gratifying. Not only will you reap the rewards of having fresh fruits and vegetables to eat but gardening helps you stay in shape, become more observant, learn patience, and be more in-tune with nature. That said, gardening is an ongoing process. It is a continual learning experience and one that is sure to surprise you, sometimes happily and sometimes frustratingly, but never will you be bored.
Garden on!
Questions? Contact Penny Bollin, Urban Conservation Technician
Email: [email protected]
Phone: (419) 893-1966 ext. 5# or (419) 377-0065
Email: [email protected]
Phone: (419) 893-1966 ext. 5# or (419) 377-0065